I started blogging three years ago. At first, it was only intended to record my experiences as a new mom and as a newbie stock market investor. Back then, I had no idea that blogging could actually make money.
Six months later, I tried to apply for Google AdSense on my first blog, but it was not approved. I tried Infolinks and that’s when I started earning a few dollars from my blog.
When I met other bloggers who were earning big on Google AdSense, I tried tweaking and improving my first blog in the hope that I will finally be approved. But to my dismay, I wasn’t approved even after five attempts. I almost gave up and lost interest in blogging.
Then I met some bloggers (turned friends) who encouraged me to create a new blog and try my luck again with Google AdSense.
Just last year, I created a new blog, published 13 articles, and after 3 months, the second blog was finally approved by Google AdSense. Btw, I first tried to apply for Google AdSense when the blog was only two months old and only had 10 articles but it was disapproved. That’s why I added 3 more articles and tried my luck again, and luckily enough, it was approved. (Please take note that getting approved by Google AdSense is a case to case basis and doing what I did may not guarantee Adsense approval. It’s still best to follow Google Adsense’ guidelines.)
After six months of blogging, I finally reached the threshold (minimum amount to withdraw) which is $100. I was very happy when I cashed it out at the Western Union branch and that’s when I believed that it’s really possible to earn online through blogging.
It’s been a year since I started earning from Google AdSense and I’m very happy with it. I don’t earn that much yet, but what I earn right now from blogging is truly a big help to my family.
I have since created a few more blogs or websites in different niches or topics.
If you are interested to know how I do it, just keep on reading because, in this article, I’ll share with you the steps on how to create a blog from scratch even if you’re a beginner or you have no idea about blogging.
Are you ready? Let’s start…

Things to Consider before you create your blog
1. Niche or Topic of your blog
Before you create your blog, make sure you know what your blog is about. Is it about food, travel, parenting, investing, or information sharing. If you don’t know the topic yet, start with something that you’re most passionate about or something that will motivate you to write blog posts.
For example, if you’re a parent, maybe you want to share about your parenting style or how you raise your child or children. You may also want to share your experiences on the things that you use at home.
If you love traveling, you might want to create a blog about your adventures or travels where you can share the places that you’ve been to and tips for other travellers. Remember, you don’t have to be perfect when you’re starting up. Just keep on writing. Eventually, your writing skills will improve and you might even shift to another niche and that’s perfectly fine. The idea here is to get started.
2. Think of your domain name
The domain name is like the title of your blog and that’s what people type on their internet browser. It’s also called the URL or website link. An example of this is www.parasapinoy.com.
You can have any domain as long as it’s available, but I suggest that you choose a domain name that is somewhat related to the topic or niche of your blog. It can be as vague as this website where I share general topics or just about anything for Pinoys or it can be as specific as a blog for shi tzu puppies. Again, it’s up to you to decide.
3. Check the availability of your domain, Gmail, and social media accounts
To check if your domain is still available, go to Namecheap, enter your domain name, for example parasapinoy.com. If it’s still available, it will show you the price of the domain. Usually it’s $10 and it can be renewed annually. If it’s not available anymore, you’ll be given other options with different extensions like .net, or .org, etc. If you want to stick with .com, which I highly recommend, think of another domain name.
When you found one that’s still available, try to sign up on Gmail and create a Facebook page with the same username or title, example, parasapinoy@gmail.com and facebook.com/parasapinoy. This is so that your username or blog title is the same for all platforms or social media accounts. This will help your brand in the future.
If it’s available, then go ahead and sign up immediately.
Remember that that steps above are helpful but they’re optional. You may skip those steps if you think you don’t need them.
Steps in Creating a Blog
Step 1 – Purchase your Domain and Web Hosting Services at Hostgator.com.
There are many domain and hosting providers out there, but I recommend Hostgator because I trust them and I never had any problems with them.
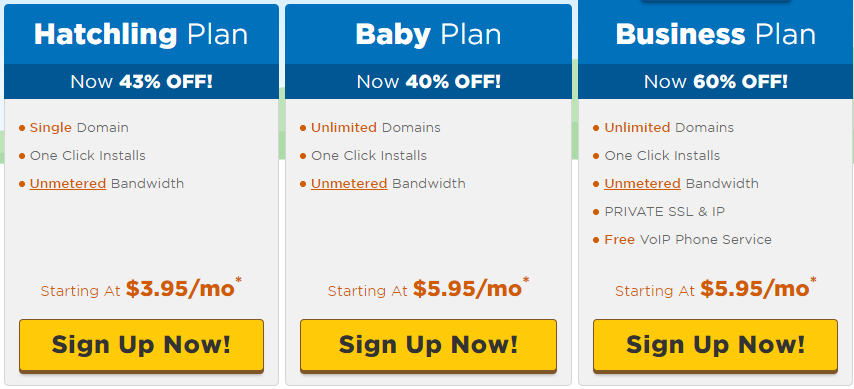 To do this, click Hostgator then click Web Hosting and choose the plan that you want to sign up with. If you plan to create just one blog, choose the Hatchling Plan. However, if you want to create more than one blogs, choose the Baby Plan. Mine is a Baby Plan and it hosts all of my websites. It’s really worth the price. You can upgrade your plan anytime.
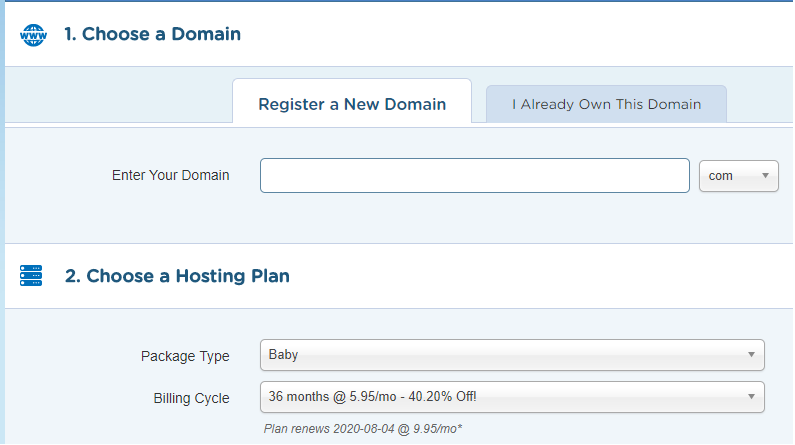
After you chose your hosting plan and the number of months or years for your package, enter your domain name. The other add-ons are optional and it’s up to you if you want to get them as well. I usually just get the domain privacy only.
Step 2 – Install WordPress through Quick Install
WordPress is your blog’s main platform or the content management system. This is where you’re going to setup the backend of your blog, install the theme and customize settings the way you want it to appear on the front-end. This is what people see when they visit your blog.
To do this, login to your Hostgator Cpanel account. After you signed up for your HostGator account, your login details should be sent to your email.
Once you’re logged in to the Cpanel, click Software > Quick Install > Install WordPress. You may have to create an account with Quick Install so just follow the next instructions.
After the installation of WordPress, the link to your blog and your username and password will be shown on the screen and it will also be sent to your email.
The link is something like this: www.parasapinoy.com/wp-admin (change it with your own domain).
You may now start customizing the settings in your WordPress dashboard.
Step 3 – Install your Blog’s Theme
After doing the initial setup of the backend, you may now install the Theme of your blog. You can choose one from the list of free themes from WordPress or install a premium theme if you have purchased one.
Then customize the theme settings according to your liking.
Step 4 – Create Pages and Menus
Create pages such as About, Contact us, Privacy Policy, and Disclosure. These are necessary especially if you’re going to monetize your blog later on. You can add other pages and create menu based on how you want them to appear on your blog.
To create a Menu, click Appearance > Menu, then add the pages that you want to add to the menu.
Step 5 – Install Plug-ins
Plug-ins make some functions easier. Some of the Plug-Ins that you can install are the WP Edit, Yoast SEO, Easy Facebook Like Box, Contact Form, Ad Inserter, and Cookie Notice. You can add as many plug-ins as you like but remember that having too many plug-ins may affect the performance or speed of your website.
Step 6 – Publish Blog Posts or Articles
After you’ve set up your blog, it’s now time to create articles. Consistency is the key here if you want to be really successful in blogging and if you want to earn from it. Publish valuable articles – those that will help your readers or that will answer their questions or that will make their life easier.
For example, if you’re a travel blogger, make an article about tips on how to commute to this beautiful place that you’ve been to. I’m sure people will appreciate your tips and will even become a loyal reader or follower.
Is it okay to purchase your domain name from Namecheap and host it under your Hostgator Plan?
YES, it’s okay. If you have an existing Web Hosting Package with Hostgator and you preferred to purchase a new Domain Name from Namecheap (like what I do with my new blogs), here’s what you should do…
- Login to you Hostgator Cpanel Account (check your email for your login information)
- Under Websites, click Domains > Addon Domains
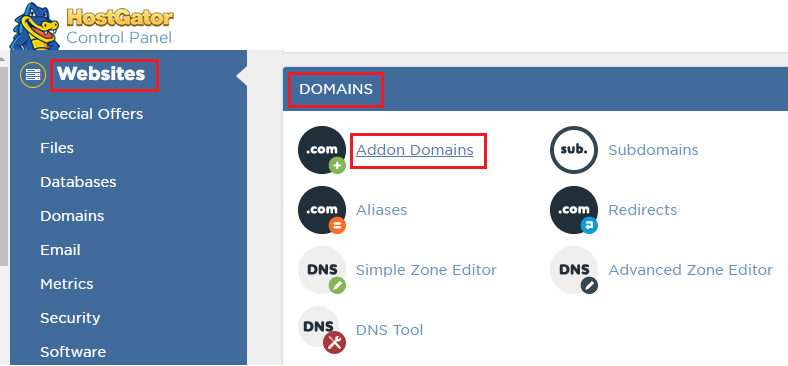
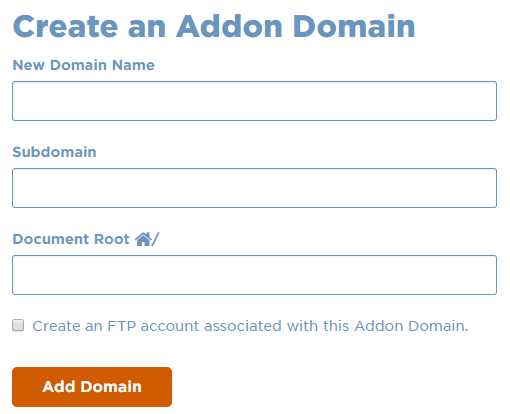
- Create an Addon Domain by entering your new domain (example parasapinoy.com), then Subdomain and Document Root will automatically show up. Then, click Add Domain.
- Install WordPress through Quick Install (follow the same instructions above for WordPress Installation and all the following steps after this)
I tried my best to explain these steps as simply as possible. If you got lost or confused at any point in this article, please let me know in the comment section and I’ll be happy to assist you.
Watch this video tutorial if you want to see the actual steps on how to create a blog.
Click here to read: How to Earn from Home through Blogging
Click here to read: How to Apply as an Online Teacher
Hi. I’m starting to create my blog. I wonder if Hostgator still works best for your site or are you planning to switch to other provider?
Hello Myr, I still have my Hostgator account, but I recently signed up with Namecheap’s hosting service because they are cheaper and their customer service representatives are more helpful than Hostgator. All my domains are from Namecheap also. If you want to consider Namecheap, you may use my affiliate link http://bit.ly/2m7bDbg if you don’t mind. 🙂
My main sites have been with Namecheap since February this year and so far so good. It’s always easy to get in touch with them if I have any questions or issues with my sites.
Let me know your blog once it’s up. I’d love to connect with you. 🙂
This is a very informative blog for people who are planning to start their career in blogging. So helpful. Thank you for making this. Anyway, just wanna ask if it is possible to make a blog site for free and still earn using it?
Hi Gem, yes, it’s possible, but your earning options are limited and using free platforms are not good for the long term. I still suggest you invest in your own domain and hosting and grow your blog from there. You won’t regret it in the future. 🙂